The NetSuite API: Exploring SOAP Requests
Learn new ways to work with NetSuite's SuiteTalk Web Services Platform to gain access to customer data for subsequent transformation, enhancement, and presentation.


Overview
Since the invention of the relational database itself, Oracle has been a force in database and software development. Today, Oracle continues to provide best-in-class software and tooling.
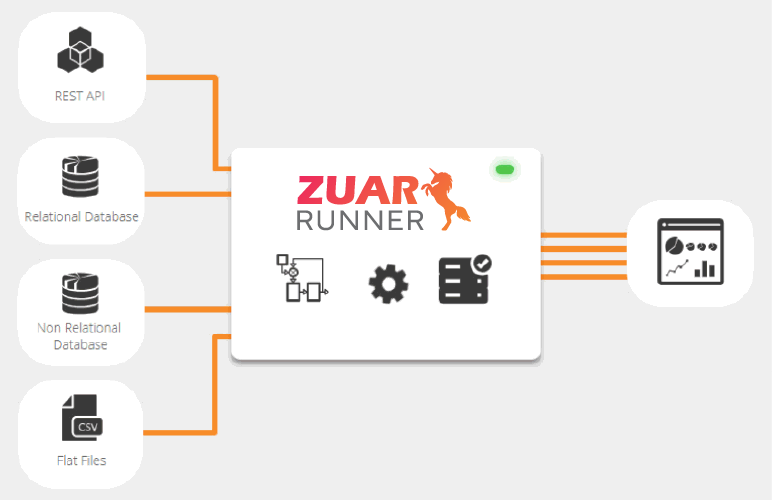
Oracle's NetSuite is an example of one such leading application— an ERP/CRM used by many of Zuar's Runner customers.
Zuar Runner's NetSuite Connector uses NetSuite's SuiteTalk Web Services Platform to gain access to customer data stored in NetSuite for subsequent transformation, enhancement, analysis, and presentation.
The configurability of NetSuite is one of its biggest pros, but means the API is exceedingly complex.
At Zuar, we know a thing or two about using data strategy to optimize business efficiency. This post provides a few tips that may be of help if you are embarking on a similar exploration.


 Team Zuar
Watch this video to learn how the NetSuite API can enhance your reporting:
SuiteTalk Web Services
Web Services are Extensible Markup Language (XML) applications mapped to programs, objects, databases, or complex business functions.
They utilize standardized XML messaging to send and receive requests over the internet. The following protocols are used to publish, expose, and access Web Services:
- Web Services Description Language (WSDL) - exposes an interface, interaction, and protocol mapping.
- Simple Object Access Protocol (SOAP) - a messaging format that defines and envelope for communication via HTTP and HTTPS.
A SOAP message is an ordinary XML document that contains:
- An Envelope element identifying the XML document as a SOAP message.
- A header element.
- A body element with call and response information.
- A fault element with errors and status information.
An excellent reference document is the SuiteTalk (Web Services) Platform Guide, linked here.

Account Setup
The examples in this post assume that a SOAP integration record is already setup in your account. If this isn't the case, refer to the Getting Started section of the SuiteTalk Platform Guide.
A summary of all the necessary steps can be found in our NetSuite Setup Instructions blog post.
NetSuite API Version
The API is versioned, with each version being specified by a WSDL file. In this post, we will use the 2017_1 version. If you use a different version, it may be necessary to modify the XML in these examples to match your API version. These resources fully describe this version used in this post:
The SOAP Schema Browser is used in conjunction with the SuiteTalk (Web Services) Records Guide available via help within your account.
Additional information can be found by searching help for NetSuite WSDL and XSD Structure.
Sending SOAP Messages
Many tools are available for interactively creating, sending, and analyzing SOAP requests. This post uses Postman - a cross-platform application that can be used to issue SOAP requests using OAuth1.0 for authentication.
Postman's documentation discusses OAuth1.0, but it doesn't describe the technique necessary to authenticate with the NetSuite API.
The key to using Postman with NetSuite is to provide pre-request JavaScript code, run prior to invoking an operation. The pre-request code creates a nonce and timestamp, stores it, and makes it available for use by the request that follows.
Initial Setup
We have to do a little setup within Postman prior to issuing our first SOAP request to the API. First we'll create an environment in which to store values that can be used by any requests.
Then we'll create a collection that will keep the requests that we create, and their results, in a single place.
Create an Environment
Postman environments are collections of variables and values. To create the environment that will contain your account information and credentials:
-
Click the gear icon in the top-right corner of the Postman UI.
-
In the Manage Environments popup that appears, click Add.
-
Provide an Environment Name, such as NetSuite Environment.
-
Add the following Variables and Initial Values:
- ACCOUNT -- the account's ACCOUNT ID
- CONSUMER_KEY -- the integration record's CONSUMER KEY
- CONSUMER_SECRET -- the integration record's CONSUMER SECRET
- TOKEN_ID -- the role's TOKEN ID
- TOKEN_SECRET -- the role's TOKEN SECRET
- WEBSERVICES_URL -- the NetSuite WebServices URL
-
Click
Add -
Once added, ensure that the environment is active. If it doesn't appear in the top-level of the pulldown to the left of the gear, use the pulldown to select it.
Once added, ensure that the environment is active. If it doesn't appear in the top-level of the pulldown to the left of the gear, use the pulldown to select it.
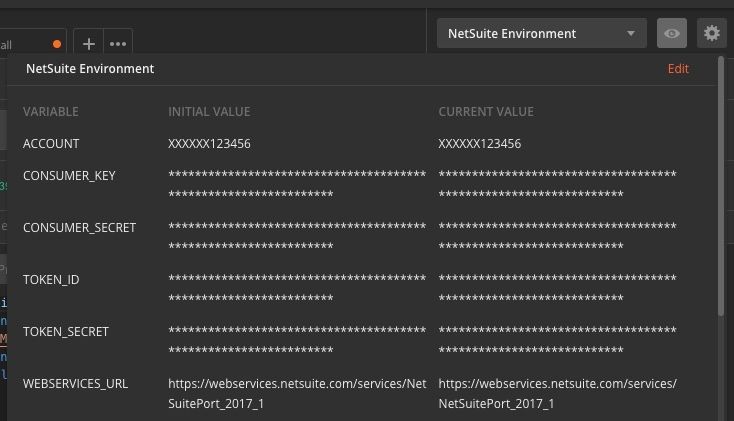
Your environment should be similar to the above, except that initial and current values will not be hidden.
See the Postman documentation on variables for more information.
Create a New Collection
Collections are used to organize associated groups of requests and responses. In Postman, create a collection, such as NetSuite API Demo.
Looking to better understand how these data tools can give insight into the right direction for your company? Check out how our data strategy service can help you today.
First SOAP Request
With setup out of the way, it's time to send a SOAP request. We'll create a request that will return all CustomList records from the account specified in the environment.
The request will return the contents of all custom lists (i.e., all customList recordType) in the account.
-
Within the collection, create a new request named
CustomList. -
Within the
CustomListrequest:-
Near the top-left of the request UI, select a
POSToperation. -
To the right of
POST, enter{{webservices_url}}as the URL. When the request is executed,{{webservices_url}}will be replaced by the value ofwebservices_urlfrom the environment. -
Under
POST, clickPre-req. In the text area belowPre-req, add the Javascript code found at the end of this document. The code will be executed prior to to invoking the operation that we are currently defining. When executed, the code will add these variables/values to the Postman environment:signature,nonce, andtimestamp. -
Under
POST, clickHeaders. Add the followingKey/Valuepairs:KEY VALUE Content-Type text/xml SOAPAction searchNOTE: the value for
SOAPActionmust match the operation that is present in thebodyof the request. In this example, our request body performs aCustomListSearh; its correspondingSOAPActionissearch. -
Under
POST, ensure thatAuth -> Typeis set toNo Auth. -
Under
POST, nothing needs to be done toParams. -
Under
POST, clickBody.Add the following XML which defines the entire request that will be sent:
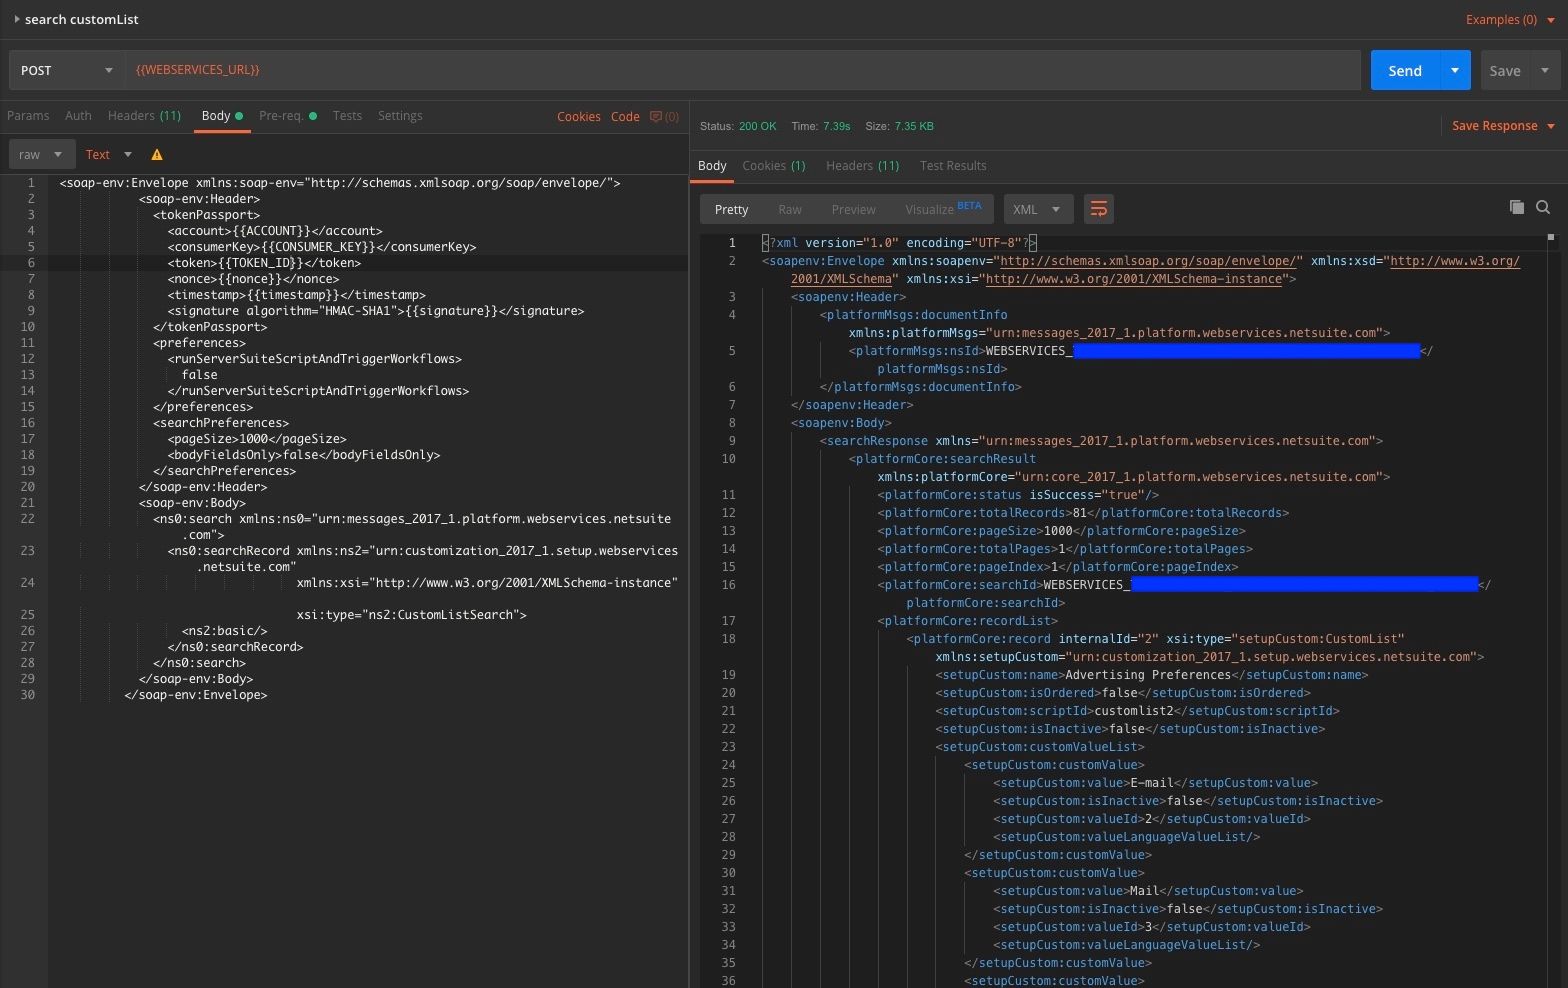
<soap-env:Envelope xmlns:soap-env="http://schemas.xmlsoap.org/soap/envelope/"> <soap-env:Header> <tokenPassport> <account>{{ACCOUNT}}</account> <consumerKey>{{CONSUMER_KEY}}</consumerKey> <token>{{TOKEN_ID}}</token> <nonce>{{nonce}}</nonce> <timestamp>{{timestamp}}</timestamp> <signature algorithm="HMAC-SHA1">{{signature}}</signature> </tokenPassport> <preferences> <runServerSuiteScriptAndTriggerWorkflows> false </runServerSuiteScriptAndTriggerWorkflows> </preferences> <searchPreferences> <pageSize>1000</pageSize> <bodyFieldsOnly>false</bodyFieldsOnly> </searchPreferences> </soap-env:Header> <soap-env:Body> <ns0:search xmlns:ns0="urn:messages_2017_1.platform.webservices.netsuite.com"> <ns0:searchRecord xmlns:ns2="urn:customization_2017_1.setup.webservices.netsuite.com" xmlns:xsi="http://www.w3.org/2001/XMLSchema-instance" xsi:type="ns2:CustomListSearch"> <ns2:basic/> </ns0:searchRecord> </ns0:search> </soap-env:Body> </soap-env:Envelope> -
Click
Send.
-
The response will appear in a separate window. In the following image, one can see both the SOAP request as well as a portion of the response.
The response can be saved, if you desire. Additional requests can be created within the collection and additional environments can be created for other accounts.
All of this will be retained within the collection by Postman.
Second SOAP Request
Rather than get everything that's available, let's drill-down a little and get only the contents of a single custom list using the custom list's internalId. To do this, we'll have to issue a get instead of a search.
-
Create a new request in your collection.
-
Set
SOAPActiontoget. -
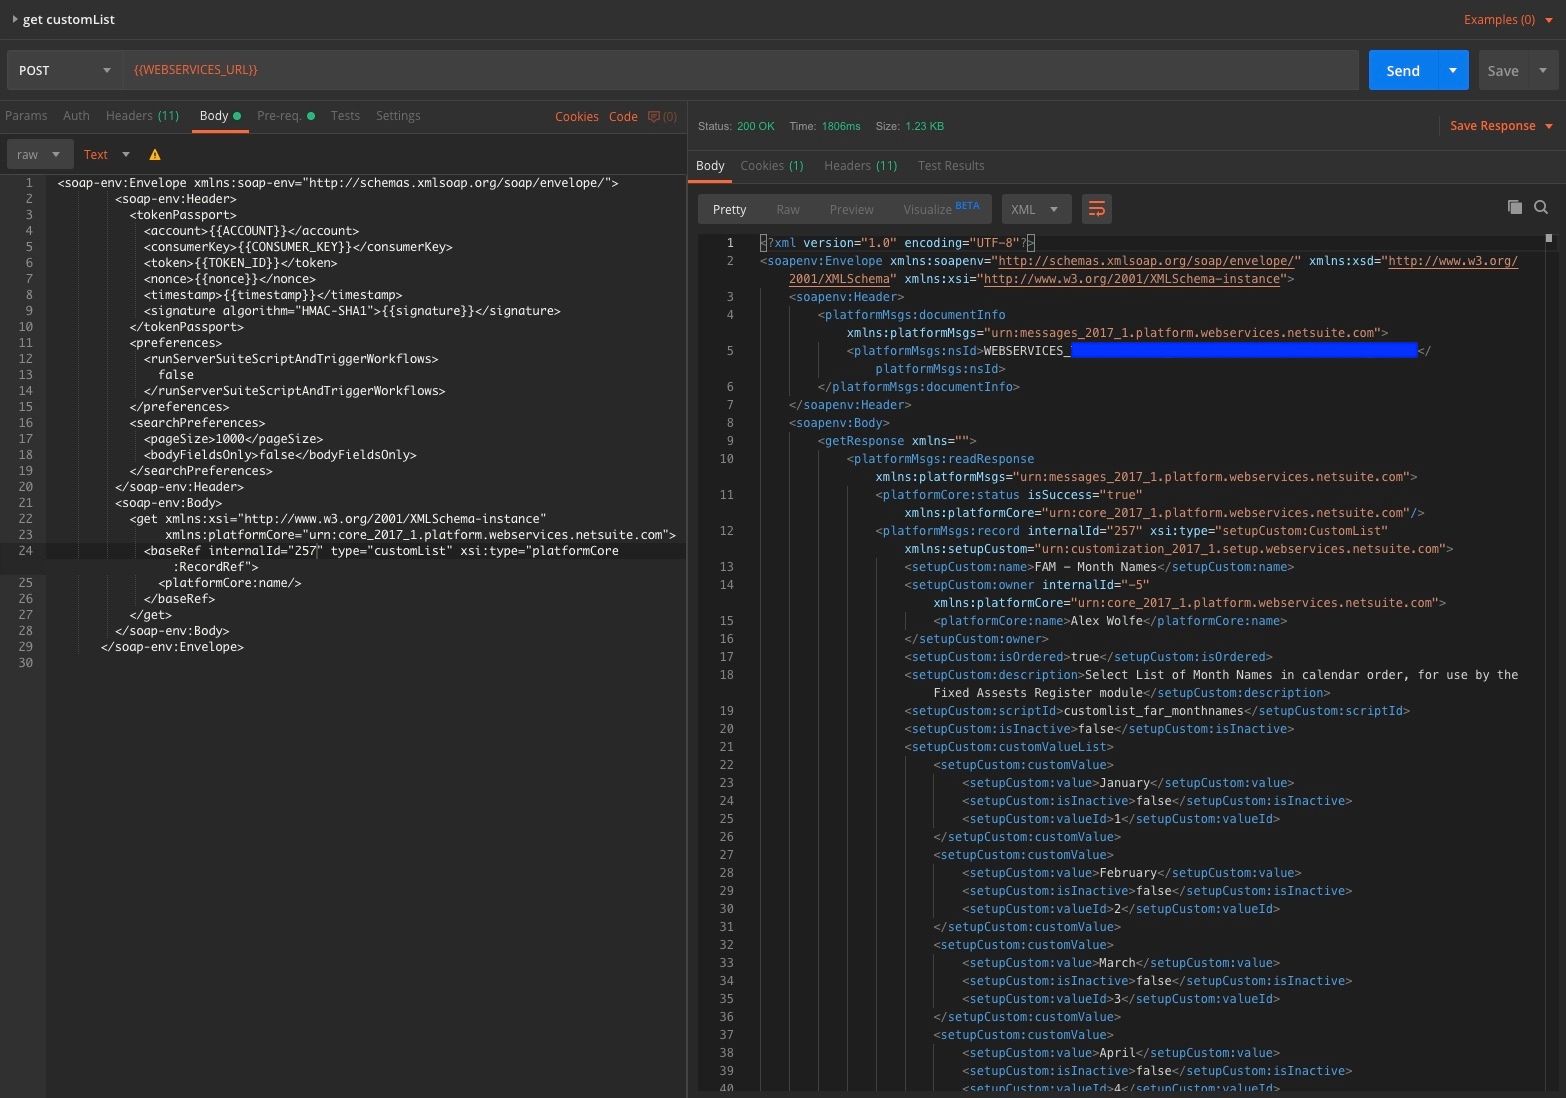
Determine the
internalIdof the desired custom list. Note that the internal id will be account-specific. This example uses257. If257is valid in your account, it will almost certainly return the contents of a different custom list. -
Use the following POST body:
<soap-env:Envelope xmlns:soap-env="http://schemas.xmlsoap.org/soap/envelope/"> <soap-env:Header> <tokenPassport> <account>{{ACCOUNT}}</account> <consumerKey>{{CONSUMER_KEY}}</consumerKey> <token>{{TOKEN_ID}}</token> <nonce>{{nonce}}</nonce> <timestamp>{{timestamp}}</timestamp> <signature algorithm="HMAC-SHA1">{{signature}}</signature> </tokenPassport> <preferences> <runServerSuiteScriptAndTriggerWorkflows> false </runServerSuiteScriptAndTriggerWorkflows> </preferences> <searchPreferences> <pageSize>1000</pageSize> <bodyFieldsOnly>false</bodyFieldsOnly> </searchPreferences> </soap-env:Header> <soap-env:Body> <get xmlns:xsi="http://www.w3.org/2001/XMLSchema-instance" xmlns:platformCore="urn:core_2017_1.platform.webservices.netsuite.com"> <baseRef internalId="257" type="customList" xsi:type="platformCore:RecordRef"> <platformCore:name/> </baseRef> </get> </soap-env:Body> </soap-env:Envelope> -
Click
Send.
In the NetSuite account I used when writing this post, internal id 257 was FAM - Month Names, as shown below.
Final SOAP Request
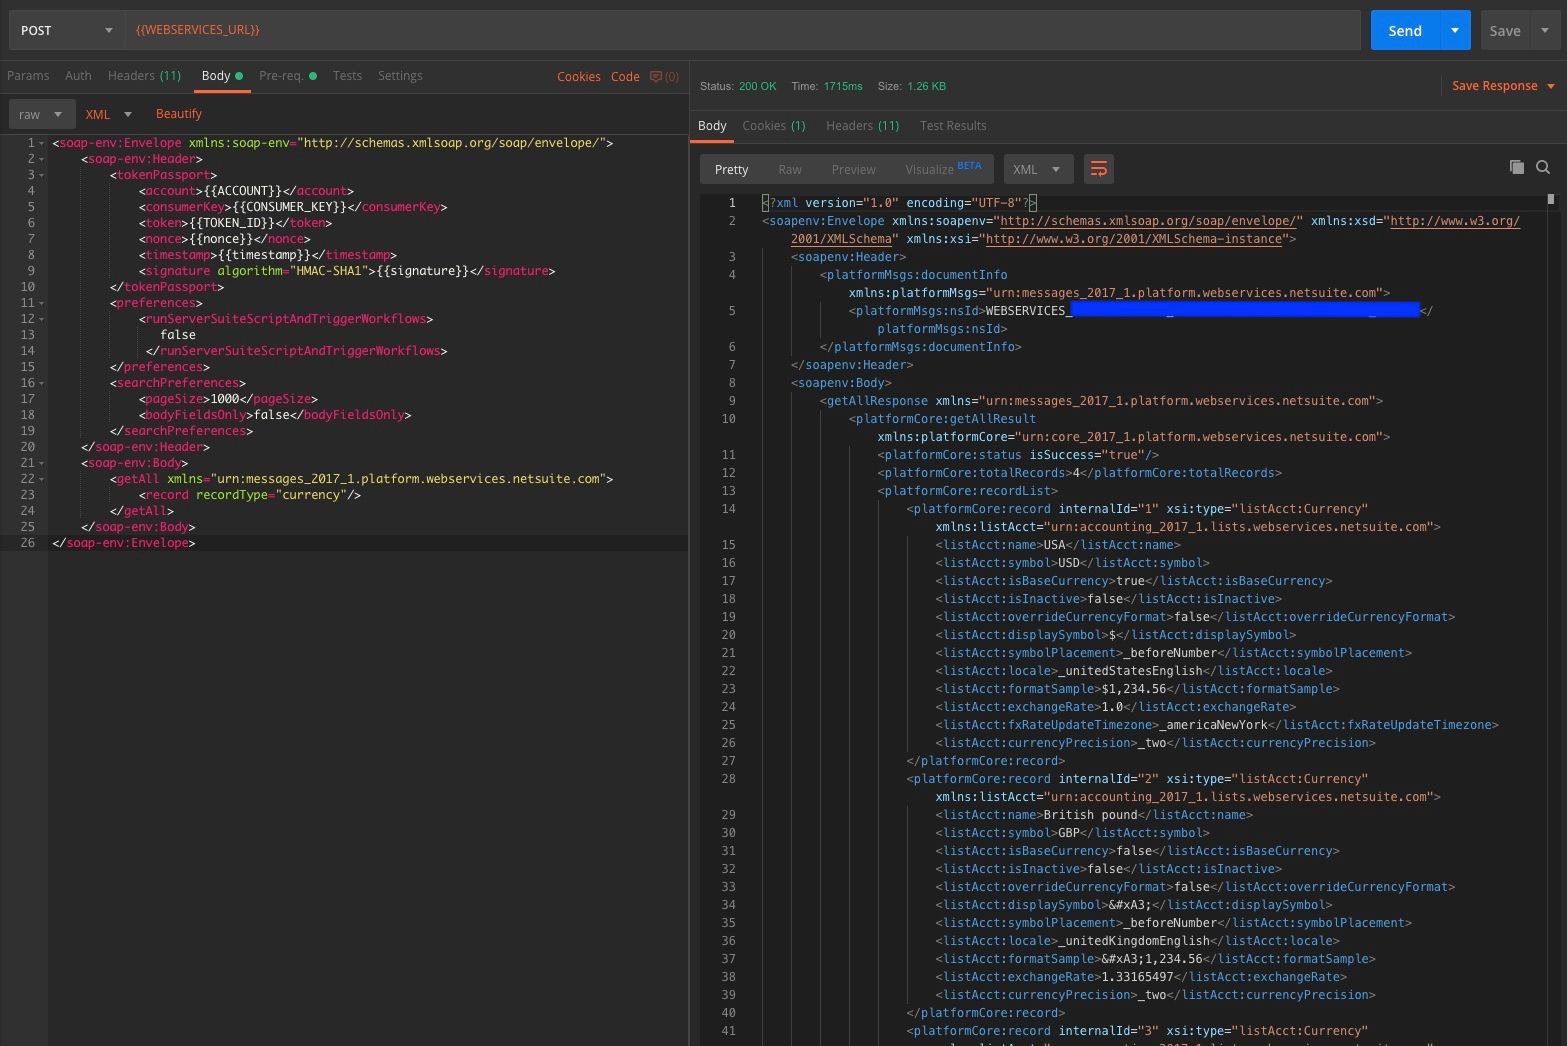
As a final example, let's get a list of all records of a specified type, in this case, currency.
-
Set
SOAPActiontogetAll. -
Use a
recordTypeof"currency". -
Use the following POST body:
<soap-env:Envelope xmlns:soap-env="http://schemas.xmlsoap.org/soap/envelope/"> <soap-env:Header> <tokenPassport> <account>{{ACCOUNT}}</account> <consumerKey>{{CONSUMER_KEY}}</consumerKey> <token>{{TOKEN_ID}}</token> <nonce>{{nonce}}</nonce> <timestamp>{{timestamp}}</timestamp> <signature algorithm="HMAC-SHA1">{{signature}}</signature> </tokenPassport> <preferences> <runServerSuiteScriptAndTriggerWorkflows> false </runServerSuiteScriptAndTriggerWorkflows> </preferences> <searchPreferences> <pageSize>1000</pageSize> <bodyFieldsOnly>false</bodyFieldsOnly> </searchPreferences> </soap-env:Header> <soap-env:Body> <getAll xmlns="urn:messages_2017_1.platform.webservices.netsuite.com"> <record recordType="currency"/> </getAll> </soap-env:Body> </soap-env:Envelope> -
Click
Send.
The request should return the list of currencies supported in the account, as shown below.
Javascript Pre-Request
This is the Javascript code that must be added to Pre-req for a request to authenticate properly:
/*
Taken from: https://gist.github.com/michoelchaikin/2a4916e0917aa0f79b8eb9d7fe275363

Usage:
1. Define a NetSuite environment in Postman
   (https://www.getpostman.com/docs/postman/environments_and_globals/manage_environments)
   with the following keys set: ACCOUNT, CONSUMER_KEY, CONSUMER_SECRET, TOKEN_ID, TOKEN_SECRET

2. Add this script to your "Pre Request Script" in Postman
   (https://www.getpostman.com/docs/postman/scripts/pre_request_scripts)

3. Add the Token Passport in your request with variable placeholders

   <tokenPassport xmlns="urn: messages_2017_2.platform.webservices.netsuite.com"
                  xmlns:ns1="urn:core_2017_2.platform.webservices.netsuite.com">
       <ns1:account>{{ACCOUNT}}</ns1:account>
       <ns1:consumerKey>{{CONSUMER_KEY}}</ns1:consumerKey>
       <ns1:token>{{TOKEN_ID}}</ns1:token>
       <ns1:nonce>{{nonce}}</ns1:nonce>
       <ns1:timestamp>{{timestamp}}</ns1:timestamp>
       <ns1:signature algorithm="HMAC-SHA1">{{signature}}</ns1:signature>
   </tokenPassport>
*/

let account = pm.environment.get("ACCOUNT");
let consumerKey = pm.environment.get("CONSUMER_KEY");
let consumerSecret = pm.environment.get("CONSUMER_SECRET");
let tokenId = pm.environment.get("TOKEN_ID");
let tokenSecret = pm.environment.get("TOKEN_SECRET");

let timestamp = new Date().getTime().toString().substring(0, 10);
let nonce = CryptoJS.lib.WordArray.random(10).toString();
let baseString = `${account}&${consumerKey}&${tokenId}&${nonce}&${timestamp}`;
let key = `${consumerSecret}&${tokenSecret}`;
let signature = CryptoJS.HmacSHA1(baseString, key).toString(CryptoJS.enc.Base64);

pm.environment.set("signature", signature);
pm.environment.set("nonce", nonce);
pm.environment.set("timestamp", timestamp);
Additional Tips
XML Requests
A discussion of how to construct valid XML for SOAP requests is beyond the scope of this note. We can, however, share a few helpful pointers.
To find examples of XML requests search for "SOAP Web Services Operations" in NetSuite help.
In an example, the content between <soapenv:Body> and </soapenv:Body> can be dropped-in to the body, replacing similar content in the examples above.
Some adjustment of namespaces may be necessary for this to work.
Proxies
Postman can be used with a proxy. This is especially handy when one needs to compare differences between requests and results.
To use a proxy, access Preferences -> Proxy, enable Global Proxy Configuration, and add the IP address/port of your proxy. Disable System Proxy.
Once this is done, your requests and responses will appear in Charles, or whatever proxy you are using.
Enhancing Reporting and Dashboards With the NetSuite API
Watch this
Next Steps
We hope that we've helped you better understand the NetSuite Web Services API. Remember to consider using Zuar Runner to get the most out of your NetSuite data. Learn more about our NetSuite Challenge!