Implementing Trusted Tickets For Tableau Server With NodeJS


This article shows how to implement trusted tickets, as described in Trusted Ticket Authentication with Tableau Server. We'll build a ticket broker with a simple API called by a front-end that uses the HTML5 <template> tag. The intended audience is users who want to integrate trusted authentication into a new or existing application.
REQUIREMENTS
- Application Server - A system to run the application, i.e., the ticket broker. This application server may technically be the same system that Tableau Server runs on, but shouldn't be, especially in production.
- Tableau Server - NOT Tableau Cloud. Full administrator access to Tableau Server is required to set up trusted authentication, but afterwards, any user can test the application. Tableau allows the same Tableau Server license to be activated two additional times for non-production use, like development, so creating a dedicated server for this development is possible.
SETUP
- Install NodeJS on the Application Server. This article assumes that
node -valready works. If thenodeapplication is not yet installed, use nvm. This code was tested withnodev12.6.0. - Configure trusted tickets on Tableau Server. The instructions are available here. You add the IP/hostname of the ticket broker as a trusted host. The new(ish) TSM web interface makes this more manageable, but you still have to bounce the server for configuration to take effect, so plan accordingly.
WARNING
DON'T RUN THIS APPLICATION PUBLICLY. The application allows the user to specify their username - i.e., who they are - by typing it into a form. This implementation is for concept demonstration only and is obviously insecure; It's equivalent to posting your username and password online.
CODE
The finished code is available on GitHub at: https://github.com/zuarbase/trusted_auth_demo.
Back-end framework
We'll start by building the ticket broker. The ticket broker will do two things:
- Expose a simple API for generating tickets.
- Serve static content via HTTP - namely, the front-end application which will only be a single file.
Create a file named server.js that containing the following code:
const http = require('http');
const https = require('https');

http.createServer(function (req, res) {
   if (req.method === 'GET') {
       console.log('200 GET ' + req.url);
       res.writeHead(200, {'Content-Type': 'application/json'});
       res.end(JSON.stringify({ticket: 'TBD'}));
   } else {
       res.writeHead(405);
       res.end('Invalid request method: ' + req.method);
   }
}).listen(8080, '0.0.0.0');This code will act as a framework for our application and is included here to test the setup. When you access the server on port 8080 via a GET request, it returns a JSON object that will constitute our API. The request URL is printed to the console to make debugging easier.
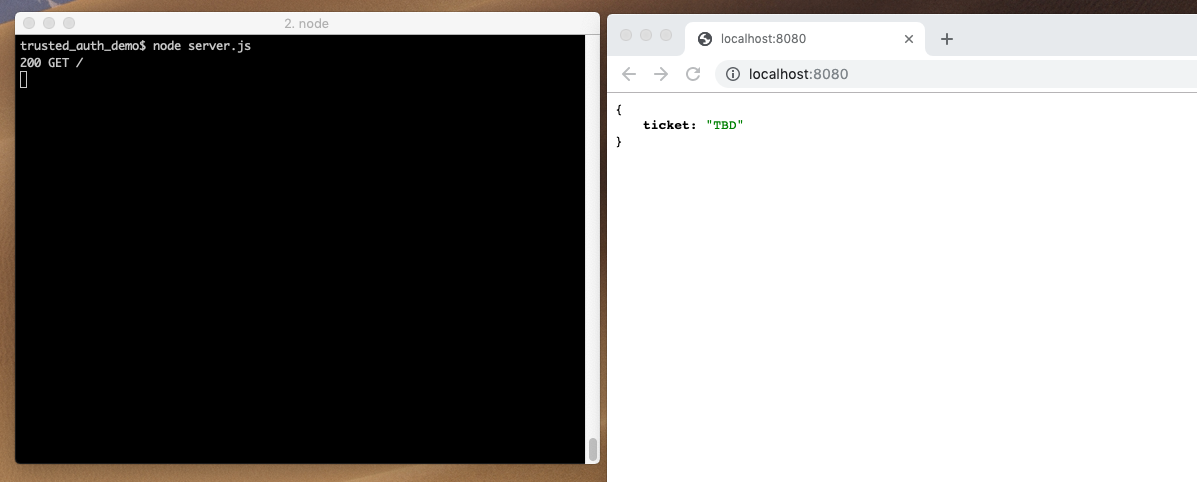
These dozen lines of code are all it takes to build and run a webserver from NodeJS. The favicon.ico request is made automatically by the browser and may be ignored. We'll later return a proper 404 response.
Next, we modify this code so that it serves up a static file for / and the JSON object at /api - all other URLs should return 404 errors.
const http = require('http');
const https = require('https');
const fs = require('fs');

function processApiResponse(res, tableauServer, username) {
    let data = {
        ticket: '<ticket for \'' + username + '\'>'
    };

    let contents = JSON.stringify(data);
    res.writeHead(200, {'Content-Type': 'application/json'});
    res.end(contents + '\n');
    console.log('200 POST /api - ' + JSON.stringify(data) + ' => ' + contents);
}

http.createServer(function (req, res) {
   if (req.method === 'GET') {
       if (req.url === '/') {
           let contents = fs.readFileSync('index.html', 'ascii');
           res.writeHead(200, {'Content-Type': 'text/html'});
           res.end(contents);
           console.log('200 GET / - ' + contents.length);
       } else if (req.url == '/api') {
	       processApiResponse(res, "http://localhost", "smith");
       } else {
           res.writeHead(404)
           res.end("Not Found");
           console.log('404 GET ' + req.url);
       }
   } else {
       res.writeHead(405);
       res.end('Invalid request method: ' + req.method);
   }
}).listen(8080, '0.0.0.0');Requests to/will return an error untilindex.htmlis created later.
This code is more boilerplate and was written for simplicity, not completeness. Ignore the lack of error handling and inconsistent logging; the idea is to create a simple Node application that doesn't use any external packages. If this were an actual application, responding to these URL via GET requests would be enough. processApiResponse() would return a trusted ticket for the currently logged in user, which is specific to your authentication mechanism, instead of a provided username. Since we're going to allow the user to specify who they are via a form (read the WARNING above again), we need to respond to a POST request with the form data. Argh, more boilerplate.
const http = require('http');
const https = require('https');
const fs = require('fs');
const querystring = require('querystring');


function processApiResponse(res, tableauServer, username, site) {
    let data = {
        ticket: '<ticket for \'' + username + '\'>'
    };

    let contents = JSON.stringify(data);
    res.writeHead(200, {'Content-Type': 'application/json'});
    res.end(contents + '\n');
    console.log('200 POST /api - ' + contents);
}

function processRequest(req, callback) {
    let chunks = [];
    req.on('data', (chunk) => {
        chunks.push(chunk);
    }).on('end', () => {
        let body = Buffer.concat(chunks).toString();
        callback(querystring.parse(body));
    });
}

http.createServer(function (req, res) {
   if (req.method === 'GET') {
       if (req.url === '/') {
           let contents = fs.readFileSync('index.html', 'ascii');
           res.writeHead(200, {'Content-Type': 'text/html'});
           res.end(contents);
           console.log('200 GET / - ' + contents.length);
       } else {
           res.writeHead(404);
           res.end('Not Found');
           console.log('404 GET ' + req.url);
       }
   } else if (req.method === 'POST') {
       if (req.url === '/api') {
           processRequest(req, function (data) {
               let site = null;
               console.log(' => ' + JSON.stringify(data));

               let url = new URL(data['share_link']);
               if (url.pathname.startsWith('/t/')) {
                   let tokens = url.pathname.split('/');
                   site = tokens[2];
               }

               processApiResponse(res, url.protocol + "//" + url.hostname, data['username'], site);
           });
       } else {
           res.writeHead(404);
           res.end('Not Found');
           console.log('404 POST ' + req.url);
       }
   } else {
       res.writeHead(405);
       res.end('Invalid request method: ' + req.method);
   }
}).listen(8080, '0.0.0.0');We've added a processRequest() function that reads the entire request body into memory and then uses the built-in module querystring to parse the result. The callback function is then handed an object containing the form data and can respond to the request. The asynchronous nature of Javascript makes this a little more complicated than usual, but the central concept is that we get the parsed request body and respond with JSON containing the ticket. Only 55 lines of code were needed to implement the ticket broker framework. All further changes to the API will be in the implementation of processApiResponse().
Test by sending a POST request to the /api endpoint:
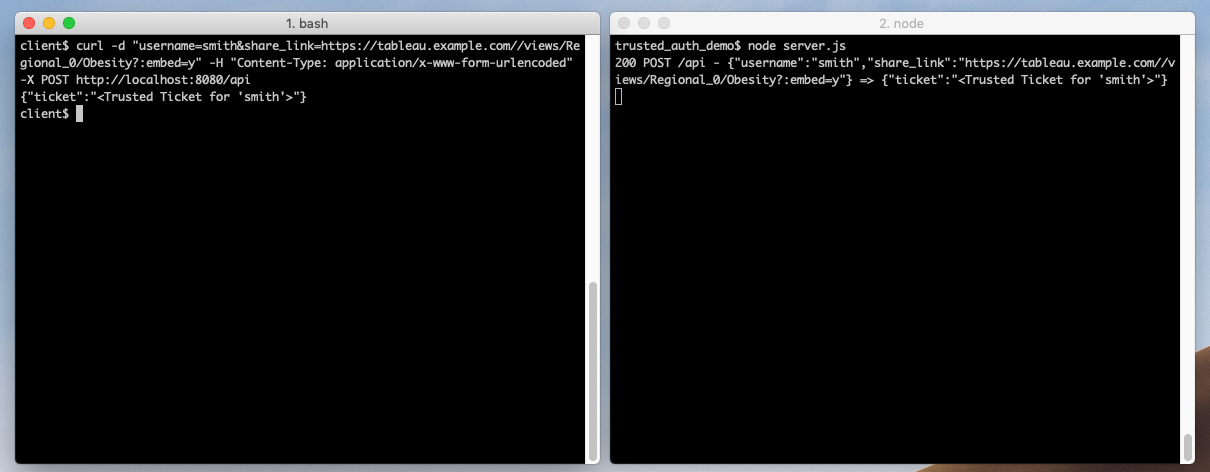
curl -d "username=<Tableau Server username>&share_link=<Tableau Server dashboard's share link>" -H "Content-Type: application/x-www-form-urlencoded" -X POST <application_server_url>:8080/apiHere, curl is used to POST data to the server and print the result. The Content-Type is application/x-www-form-urlencoded which is how a browser automatically submits a <form>.
Related Article:

Front-end framework
More boilerplate: start with a basic Bootstrap template to make the page look better, then we add functionality.
<!doctype html>
<html lang="en">
  <head>
    <!-- Required meta tags -->
    <meta charset="utf-8">
    <meta name="viewport" content="width=device-width, initial-scale=1, shrink-to-fit=no">

    <!-- Bootstrap CSS -->
    <link rel="stylesheet" href="https://stackpath.bootstrapcdn.com/bootstrap/4.3.1/css/bootstrap.min.css" integrity="sha384-ggOyR0iXCbMQv3Xipma34MD+dH/1fQ784/j6cY/iJTQUOhcWr7x9JvoRxT2MZw1T" crossorigin="anonymous">

    <title>Hello, world!</title>
  </head>
  <body>
    <h1>Hello, world!</h1>
  </body>
</html>
Access the default URL using the JS server, and you can see Hello, world!. Very original. The optional javascript includes have been removed from the template since they are unneeded.
Next, add a form that is submitted via AJAX so that we can use the results. The <form> itself has Bootstrap classes for styling, but those classes don't affect the functionality. The most significant change is the use of fetch() to retrieve the JSON API results, which are displayed in a div. The API call results are returned via the first promise as JSON and passed to the second promise via body.
<!doctype html>
<html lang="en">
<head>
<!-- Required meta tags -->
<meta charset="utf-8">
<meta name="viewport" content="width=device-width, initial-scale=1, shrink-to-fit=no">
<!-- Bootstrap CSS -->
<link rel="stylesheet" href="https://stackpath.bootstrapcdn.com/bootstrap/4.3.1/css/bootstrap.min.css" integrity="sha384-ggOyR0iXCbMQv3Xipma34MD+dH/1fQ784/j6cY/iJTQUOhcWr7x9JvoRxT2MZw1T" crossorigin="anonymous">
<title>trusted_auth_demo</title>
</head>
<body>
<div class="container" style="margin-top: 2em">
<form id="form" action="/api">
<div class="form-group">
<label for="username">Username:</label>
<input class="form-control" id="username" name="username" />
</div>
<div class="form-group">
<label for="share_link">Share Link:</label>
<input class="form-control" id="share_link" name="share_link" />
</div>
<button type="submit" class="btn btn-primary">Submit</button>
</form>
</div>
<div class="container" style="margin-top: 2em">
<pre id="response">
</pre>
</div>
<div class="container text-center" id="containerDiv">
</div>
<script>
document.forms['form'].addEventListener('submit', function (event) {
event.preventDefault();
fetch(event.target.action, {
method: 'POST',
body: new URLSearchParams(new FormData(event.target))
}).then(function (res) {
return res.json();
}).then(function (body) {
document.getElementById("response").innerText = JSON.stringify(body);
});
});
</script>
</body>
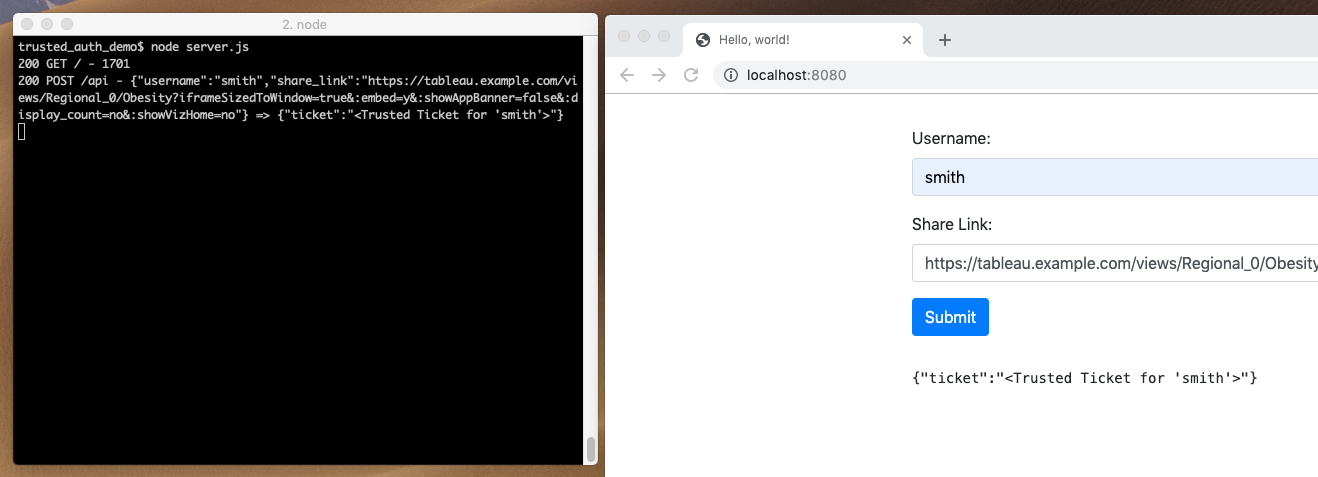
</html>Input a Tableau Server username and copy the 'Share' link from a Tableau Server dashboard into the <input> field (There is NO error checking) and press 'Submit'. The hostname from the 'Share' link will later be used by the API to contact the Tableau Server.
Trusted Ticket Implementation
The code so far is solely a framework for our application - there has been no Tableau-specific code at all. Now we add the processApiResponse() implementation that is responsible for getting a trusted ticket from Tableau Server:
function processApiResponse(res, tableauServer, username, site) {
    let url = new URL(tableauServer + '/trusted');
    let body = {
        username: username,
    };
    if (site) {
        body['target_site'] = site;
    }

	let postData = querystring.stringify(body);
    console.log(' => POST ' + url + ' ' + postData);

    let module = http;
    if (url.protocol === 'https:') {
        module = https;
    }

    let req = module.request({
        method: 'POST',
        hostname: url.hostname,
        path: '/trusted',
        headers: {
            'Content-Type': 'application/x-www-form-urlencoded'
        }
    }, function (tableauServerResponse) {
        let ticketData = '';
        tableauServerResponse.on('data', function (chunk) {
            ticketData += chunk;
        });

        tableauServerResponse.on('end', function () {
            let contents = JSON.stringify(
                {
                    ticket: ticketData
                });
            res.writeHead(200, {'Content-Type': 'application/json'});
            res.end(contents + '\n');
            console.log('200 POST /api - ' + contents);
        });
    });

    req.on('error', function (error) {
        console.log('ERROR: ' + error);
    });

    req.write(postData);
    req.end();
}This code returns the response from the application server URI /api by sending a POST request to Tableau Server via the URI /trusted and returns a JSON object containing the result. The response from Tableau Server is either the ticket itself on a successful call or the literal "-1" on error. No additional error information is provided to the client. (There is some additional information provided in the Tableau Server logs).
The format of the POST request data is describe here, but it's essentially the username and site sent as form data.
At this point, we have a working API that the front-end can use to display a visualization. The complete code is available as server.js in the GitHub repository.
Front-End Application
The last step is to display the iframe element containing the view. Regardless of how this is done, directly, <script> tag, or using the Javascript API, the result uses an iframe. The last two options dynamically add the iframe element to the DOM in the same way we're going to do here. In a real embedded application - instead of a demo - the Javascript API would probably be used.
The final script tag in index.html becomes:
<script>
document.forms['form'].addEventListener('submit', function (event) {
event.preventDefault();
fetch(event.target.action, {
method: 'POST',
body: new URLSearchParams(new FormData(event.target))
}).then(function (res) {
return res.json();
}).then(function (body) {
document.getElementById("response").innerText = JSON.stringify(body);
if (body.ticket === '-1') {
return;
}
let url = new URL(document.getElementById('share_link').value);
url.pathname = '/trusted/' + body.ticket + url.pathname;
let iframe = document.createElement('iframe');
iframe.src = url.href;
iframe.width = '800px';
iframe.height = '600px';
document.getElementById("containerDiv").appendChild(iframe);
});
});
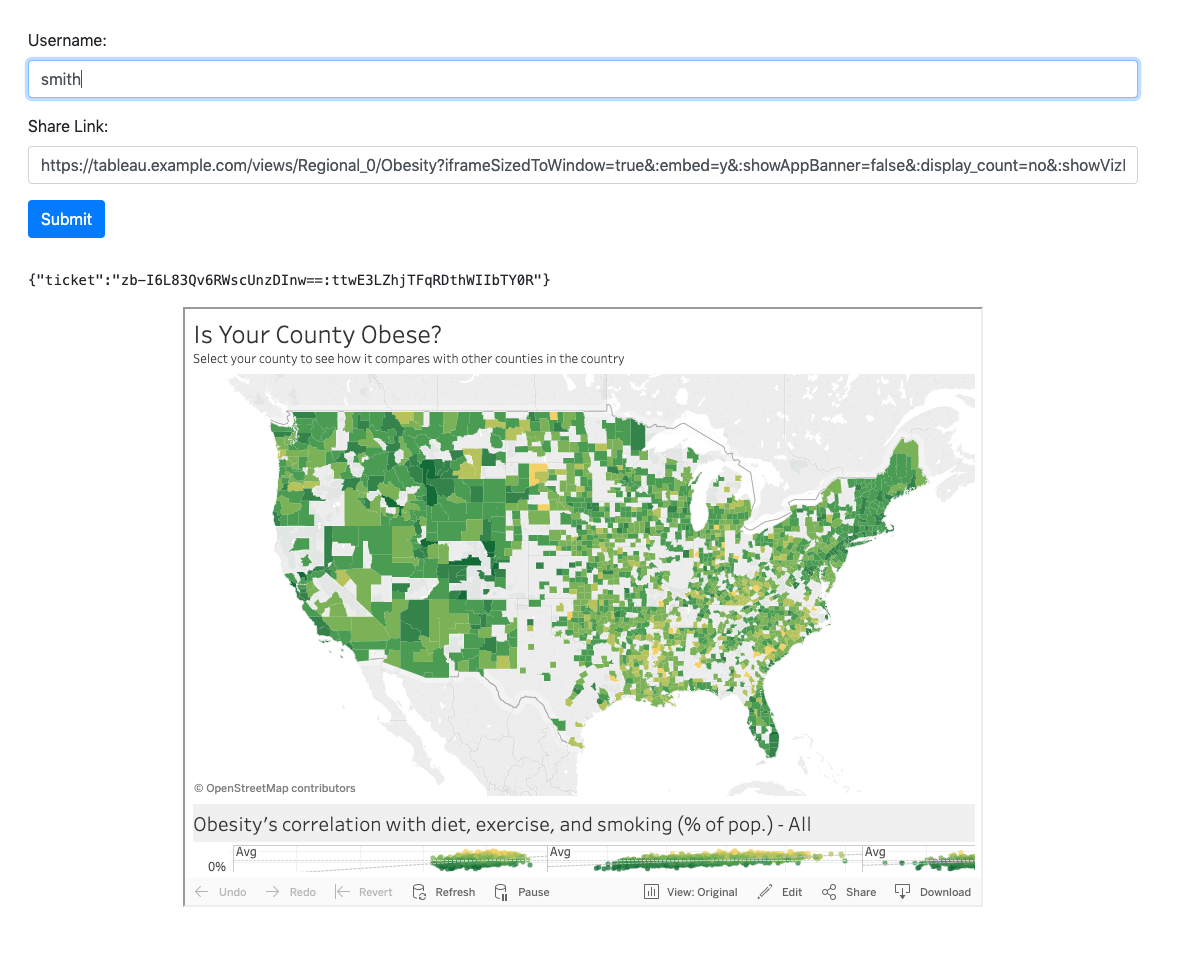
</script>The code takes the share link and prepends /trusted/<ticket> to the path in the URL then displays the result in a <iframe> tag. The element in the DOM with id containerDiv indicates where to put the dynamically generated tag. The API response is presented for informational purposes. Since this ticket is a one-time use ticket, it's perfectly safe to show its value.
Conclusion
This article built an embedded Tableau application with trusted authentication using only Javascript. The application demonstrates all the steps a developer needs to get trusted tickets working in their own application. The code can be downloaded and run from GitHub to test your Tableau Server trusted ticket setup.
Take advantage of everything Zuar offers to companies using Tableau!
- Zuar Portals are an easy way to provide branded Tableau dashboards. Monetize your data or provide secure access outside of corporate firewalls.
- Transport, warehouse, transform, model, report & monitor. Zuar Runner gets data flowing from hundreds of potential sources into a single destination for Tableau.
- Zuar's team of Tableau-certified consultants can take the headaches out of even the most complex projects.


 Greg Rossi